The Four Seals on Your Garage Door (and What Each One Does)
Most people think of "weatherstripping" as a single strip, but a properly sealed garage door relies on four separate components working together. When homeowners notice a draft or a water line on the garage floor, the failed piece is usually one of these four, and identifying which one saves time and money.
Understanding the system also explains why a single new bottom seal sometimes does not fully solve a draft. Air and water take the path of least resistance, so if the bottom seal is new but the side stop weatherstripping is brittle and pulling away, you will still feel the leak. A complete seal job addresses the whole perimeter as one envelope, not one strip in isolation.
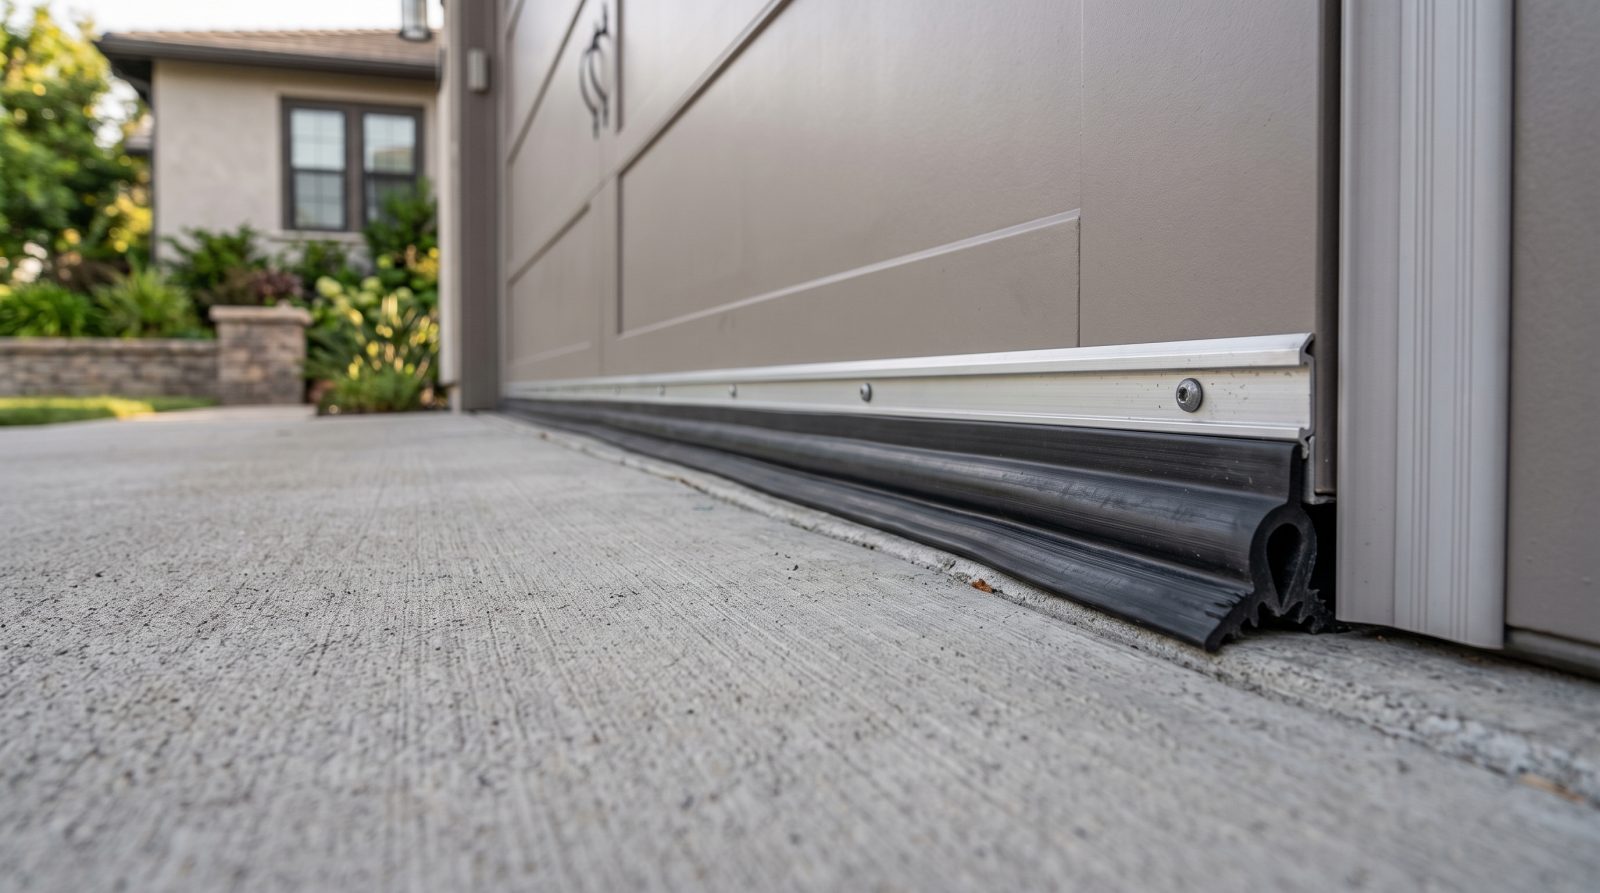
- Bottom seal (astragal): The flexible rubber or vinyl gasket that runs along the bottom edge of the door and presses against the floor. It is the hardest-working seal, the most exposed to sun and water, and the one that fails first in Sacramento heat.
- Bottom retainer/track: The aluminum channel (often a T-style or U-style groove) bolted to the bottom of the door that holds the seal. A bent, corroded, or wrong-profile retainer is why some replacement seals will not stay in or seat correctly.
- Side and top weatherstripping (door stop molding): The strip mounted to the wood or PVC stop molding around the door frame. It seals the gap between the door face and the jamb and is what blocks the Delta breeze and blowing dust.
- Threshold seal: An optional rubber threshold bonded to the garage floor itself. It is the best defense against rainwater, slope-related pooling, and leaves blowing in, and pairs well with a fresh bottom seal on uneven or older slabs.
How Sacramento's Climate Wears Seals Out Faster
Garage door seals are rated to last for years, but those ratings assume a moderate climate. Sacramento is not moderate. The single biggest enemy of garage door rubber here is UV exposure combined with sustained heat. A south- or west-facing door in Land Park, Natomas, or Elk Grove can see surface temperatures well above the air temperature on a summer afternoon, and that heat cycle hardens vinyl and breaks down rubber far faster than the same door would age in a milder coastal town.
The second factor is the daily temperature swing. The Valley's dry climate means a hot afternoon is often followed by a notably cooler evening as Delta air moves in. Seals expand in the heat and contract at night, over and over, and that constant flexing causes vinyl bottom seals to shrink lengthwise and harden until they no longer make contact with the floor. By the time you can slide a pencil under a closed door, the seal has lost its squeeze.
Winter brings the opposite stress. Tule fog and the rainy season push damp air and standing water toward the door, and a hardened seal that no longer compresses lets that moisture seep onto the garage slab. Homeowners in older neighborhoods like East Sacramento, Curtis Park, and Oak Park often have slabs that have settled unevenly over decades, which leaves a high spot and a low spot under the same door, so a worn one-size seal will leak at the low corner even while it touches at the high corner.
- UV and radiant heat: West-facing doors degrade fastest, often showing chalky, cracked rubber within a few seasons.
- Thermal cycling: Daily expand-contract swings make vinyl seals shrink and pull back from the door ends.
- Dust and pollen: Valley dust and almond/grass pollen pack into a hardened seal, abrading it and preventing a clean compression.
- Winter moisture: Fog and rain expose any gap; uneven older slabs make low corners leak first.
- Rodents and insects: A gap as small as a quarter-inch lets mice, spiders, and ants in; a failed seal is a pest entry point as much as a draft.
Signs It's Time to Replace Your Weatherstripping
Seal failure is gradual, so it is easy to live with for months without realizing how much comfort and efficiency you are losing. A quick daytime inspection tells you almost everything. With the door fully closed, stand inside the dark garage and look along the bottom and sides; any daylight you can see is air, water, and pests getting in. Then run your hand along the rubber and flex it. Healthy seal is soft and springs back; failed seal is stiff, cracked, chalky, or torn.
Beyond the visual check, the way the garage feels and smells is a strong signal. A garage that is suddenly noticeably hotter in summer or colder in winter, a musty or dusty smell after a windy day, leaves or water collecting just inside the door, or even an uptick in your cooling bill can all trace back to a perimeter that no longer seals. If you store anything heat- or moisture-sensitive in the garage, those items are the canary in the coal mine.
- Visible daylight under or beside the closed door, especially at the corners.
- Bottom seal that is cracked, flattened, brittle, torn, or hanging loose from the retainer.
- Water lines, leaves, or dirt collecting just inside the door after rain or wind.
- A garage that runs hot in summer or cold in winter relative to the rest of the house.
- Increased dust on stored items, or new evidence of insects or rodents.
- Side/top weatherstripping that is split, painted-over and rigid, or peeling away from the jamb.
- Wind whistling or rattling around the door on a breezy Delta afternoon.
What Replacement Involves and Whether to DIY
Replacing the bottom seal is one of the rare garage door jobs that does not involve the high-tension springs or cables, which makes it relatively safe compared to spring or opener work. On a typical sectional steel door, the old seal slides out of the aluminum retainer channel at one end, and a new seal of the matching profile slides back in, usually with a little soap or lubricant to ease it through the groove. The catch is that the new seal must match the retainer profile exactly: a T-style seal will not stay in a bead/P-style channel, and the wrong width either falls out or refuses to feed in. This is the number one reason a DIY attempt stalls.
Side and top weatherstripping is nailed or screwed to the stop molding, so replacing it means removing the old strip, cleaning the jamb, and fastening new molding with the vinyl flap lightly contacting the closed door face, not crushed against it. Too tight and the door binds or the opener strains; too loose and you have not fixed the gap. Threshold seals are glued to the floor and require a clean, dry, properly prepped slab to bond, plus correct positioning relative to where the door lands.
DIY is reasonable for a handy homeowner on a standard door with an easy-to-source seal profile. It becomes worth calling a pro when the retainer itself is bent or corroded, when the door is wood or a non-standard size, when the slab is uneven and a single seal will not close the gap, or when you simply want it measured, matched, and installed correctly the first time without buying the wrong part twice. Because we are mobile, we bring the common seal profiles and retainers to your driveway, measure the door on site, and fit the right one rather than leaving you to guess at a hardware store.
- Bottom seal swap: no spring contact required; main risk is profile/size mismatch with the existing retainer.
- Retainer replacement: needed if the channel is bent, split, or corroded, or to upgrade an old single-channel retainer to a dual-channel for a better seal.
- Side/top weatherstripping: set the flap to just kiss the closed door, never crush it, to avoid binding the opener.
- Threshold seal: requires clean, dry, prepped slab and correct placement; great for uneven or sloped floors.
- When to call a pro: bent retainers, wood/oversized doors, uneven slabs, or you want it matched and done once.
Costs, Materials, and Getting the Most Value in the Valley
Garage door seals are inexpensive relative to nearly every other door repair, which is what makes them such a high-return improvement for a Sacramento home. As a general guide, the materials and labor for a bottom seal and weatherstripping refresh fall at the affordable end of the garage door repair spectrum; the exact figure depends on door width, the seal profiles involved, whether the retainer needs replacing, and whether you add a floor threshold. These are industry ranges, not a quote, and the best way to get a real number for your specific door is a free quote based on the actual measurements.
Material choice matters more here than in milder climates. For a Valley door taking direct sun, a quality UV-resistant rubber or EPDM bottom seal will outlast a cheap vinyl strip by a wide margin, because vinyl is the material most prone to the shrinking and hardening that Sacramento heat accelerates. Upgrading an old single-channel bottom retainer to a dual-channel design can also meaningfully improve the seal on doors with minor floor irregularities. Pairing a fresh bottom seal with a bonded threshold is the strongest setup for homes on older or sloped slabs where rainwater tends to pool toward the door.
The value of sealing goes beyond comfort. A tight perimeter keeps conditioned air where it belongs, reduces the dust and pollen load inside, protects stored belongings and any garage workspace, and shuts the door on pests before they get established. For homeowners with an attached garage, sealing also helps keep Valley heat and outdoor air from migrating into the living space through the shared wall. It is a small, fast job with comfort and protection benefits you notice immediately.
- Seals are among the lowest-cost garage door repairs; final price depends on width, profiles, retainer, and threshold add-ons (industry ranges, not quotes).
- Choose UV-resistant rubber/EPDM over basic vinyl for sun-exposed Valley doors so the seal lasts.
- Consider a dual-channel retainer or a bonded threshold for doors over uneven or older slabs.
- Benefits: steadier garage temperature, lower dust/pollen intrusion, water control, pest defense, and protection for an attached home's shared wall.
- Request a free quote so the door is measured and the correct seal is matched on site.